
Set fees and discounts depending on the payment gateway
Set fees and discounts depending on the payment gateway
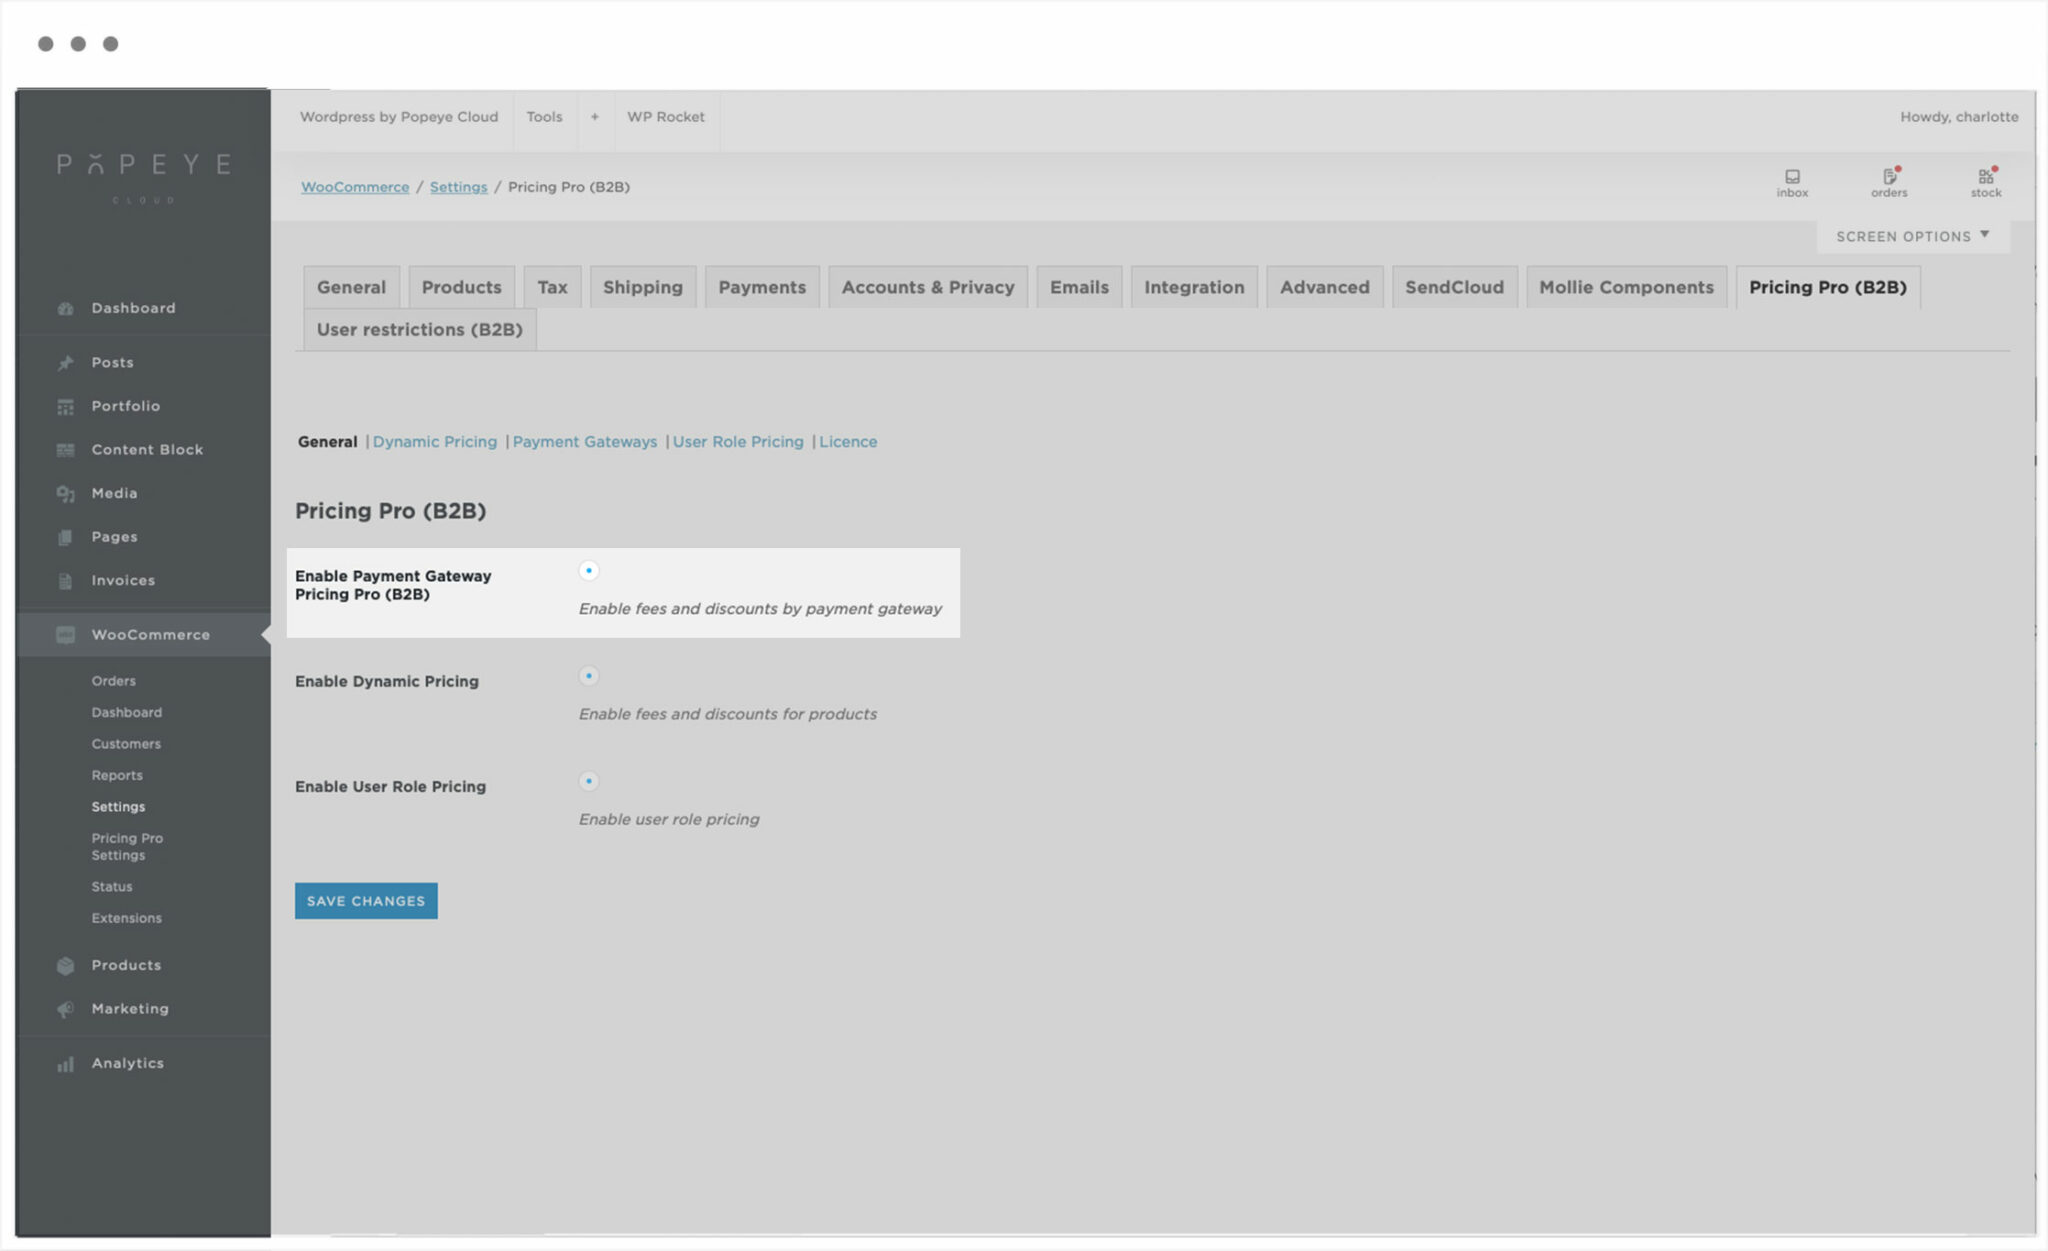
— Enable Payment Gateway Pricing Pro (B2B)
Payment Gateway
To set an additional fee or discount depending on the payment gateway chosen by your customer, go to WooCommerce > Settings > Pricing Pro (B2B) and ensure that the ‘Enable Payment Gateway Fees and Discounts’ option is selected.
Click on the ‘Payment Gateways’ menu item under the main tabs. You should see all the active payment gateways on your site listed below the page title.

Select the payment gateway where you’d like to create a fee or discount.
Label
In ‘Label’ enter the text that you’d like to use to denote the extra charge
Type
Choose the type of fee or discount in the ‘Type’ dropdown. The options are:
- Fixed discount
- Fixed fee
- Percentage discount
- Percentage fee
- Disabled
Amount
Enter the amount of the fee or discount in the ‘Amount’ field
Include shipping costs
Decide whether to include shipping costs in the cart total. (Note that this is mainly relevant if you’re charging a percentage rather than a fixed fee and/or if you are setting minimum or maximum values for the cart)
Minimum cart amount
Minimum cart amount
Maximum cart amount
In ‘Maximum cart amount’, you can enter a maximum total for the cart above which no charges will be applied.
Minimum fee/discount amount
Enter a figure here to define the minimum value of the fee or discount
Apply tax
Check ‘Apply tax’ if you would like tax to be applied to the extra charge
Tax class
Select the ‘Tax class’
Tips 'n tricks
Hover over the question mark to get more info.The payment gateway is the method used by the customer to pay for their order. Examples are PayPal, Stripe (for credit card payments), bank transfer, cash on delivery, and many more.
How to create bulk pricing rules
How to create bulk pricing rules
— How to create discount levels.
Bulk pricing rules
To create a bulk pricing rule, go to WooCommerce > Settings > Pricing Pro (B2B) and click on the ‘Dynamic Pricing’ submenu > Offer type > choose ‘Bulk pricing’.

Create discount levels
You can create different levels of discount, e.g.:
Less than 10 items, no discount
10 to 20 items, 10% discount
21 to 30 items, 20% discount
More than 30 items, 30% discount
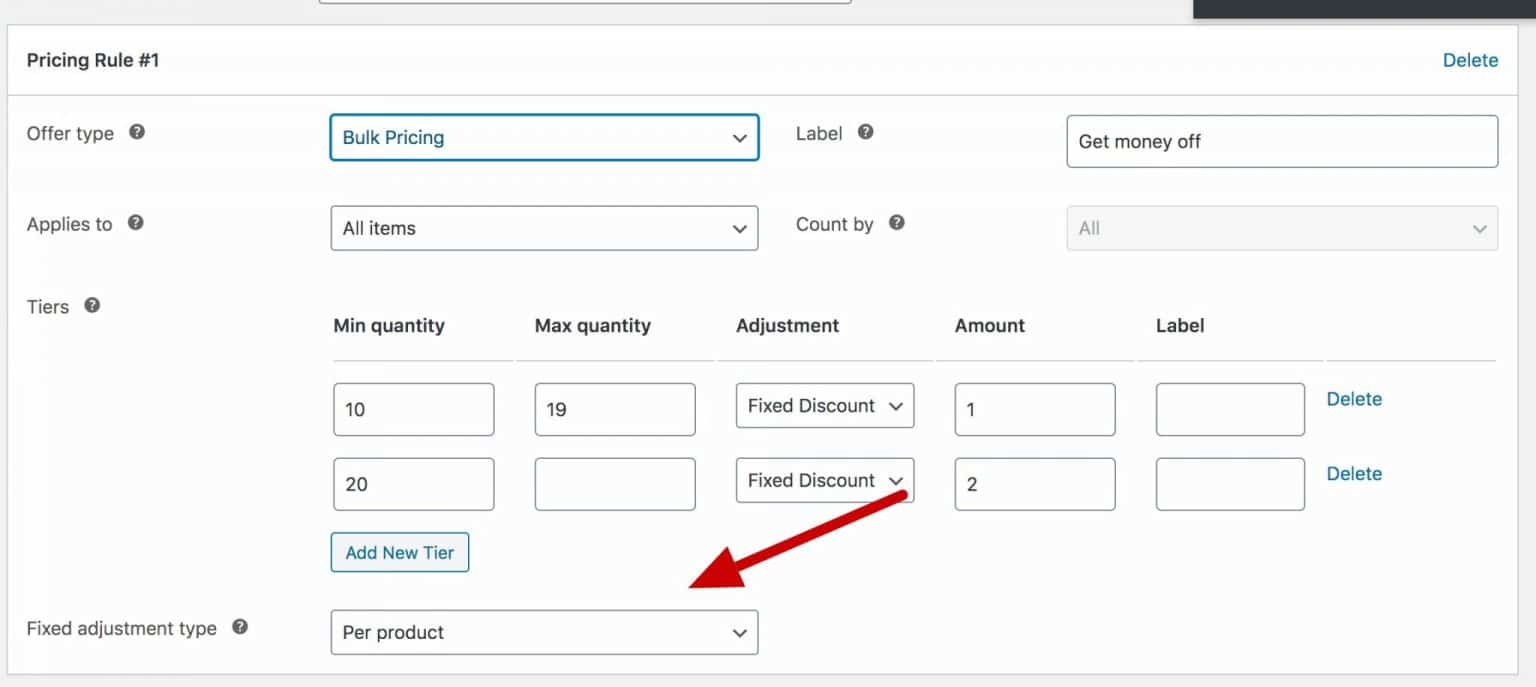
For each level, you need to create a ‘tier’.
Click ‘Add New Tier’ to create a new tier.
Min quantity
Enter the minimum quantity of product needed to require for this tier. If you leave this blank, then there’s no minimum.
Max quantity
Enter the maximum quantity of product that qualifies for this tier. If you leave it blank, then this discount will apply to all quantities above the minimum.
Adjustment
Choose the type of discount. Pick from:
- Fixed Discount
- Fixed Fee
- Percentage Discount
- Percentage Fee
Amount
Choose the value of the discount for this tier. Note that this figure is either a fixed value or a percentage of the product price, depending on what you’ve chosen in the ‘Adjustment’ field.
Label
You can add an optional label to accompany the discounted total in the cart.

Fixed fees and adjustments per product
If you are using either ‘Fixed fee’ or ‘Fixed discount’ then the amount will be adjusted based on the total, not per item.
If you want to apply your fixed adjustment per item, e.g. $1 per item in the cart, choose ‘Per product’ in the ‘Fixed adjustment type’ field.
Buy products
If you choose ‘Specific products’ under ‘Applies to’, you’ll see an extra field appear. ‘Buy products’ allows you to define which products are eligible for the offer. Leave empty for all products to be eligible.
Tips 'n tricks
Hover over the question mark to get more info.
How to create a dynamic pricing rule
How to create a dynamic pricing rule
— Enable fees and discounts for products
Dynamic pricing rule for a product
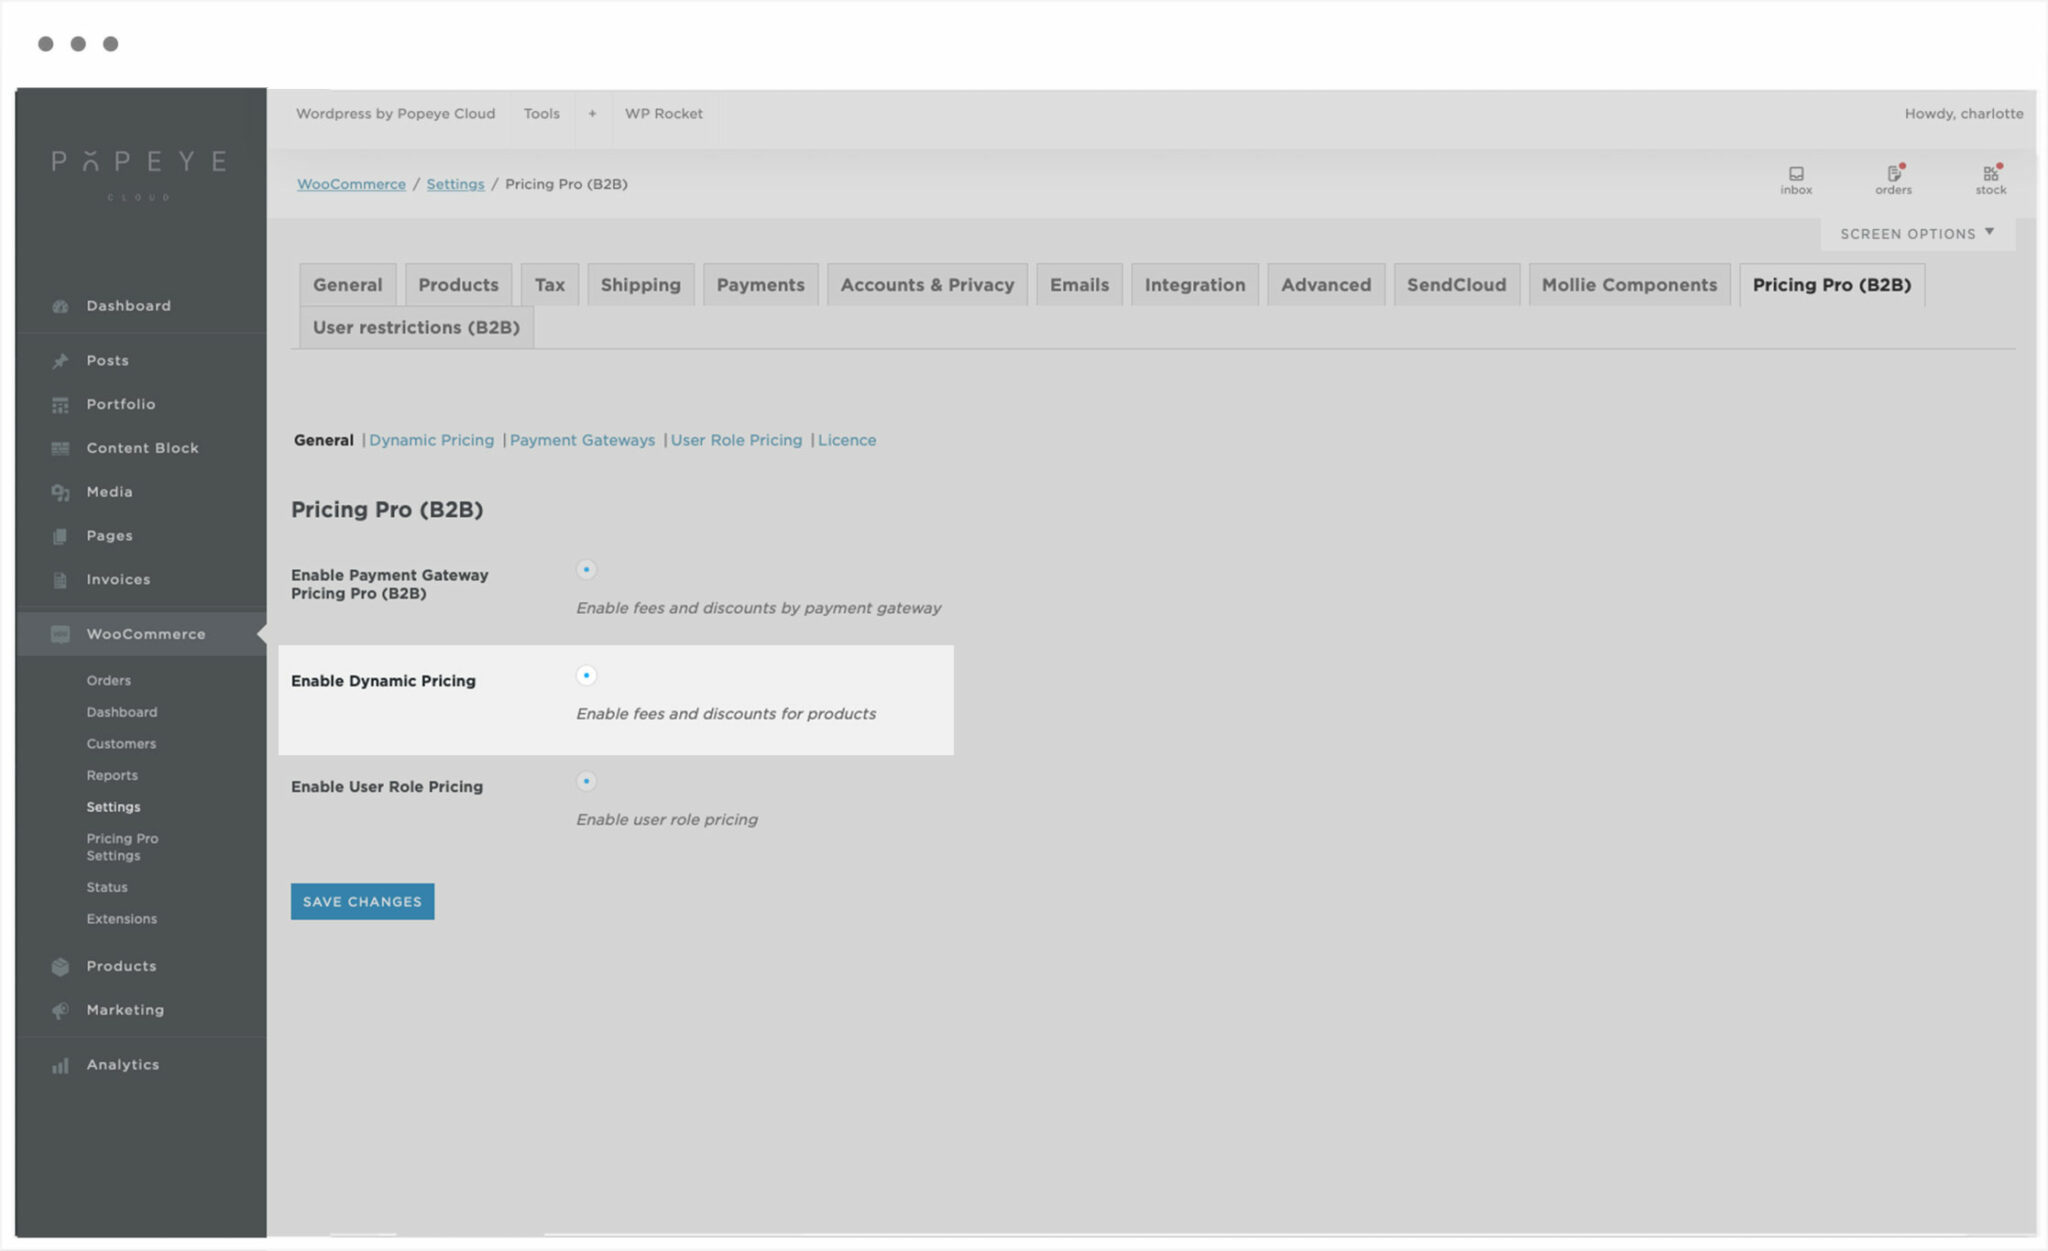
To create a pricing rule, go to WooCommerce > Settings > Pricing Pro (B2B) and ensure that the ‘Enable Dynamic Pricing’ checkbox is selected.
Click on the ‘Dynamic Pricing’ menu link under the tabs.
Click ‘Add Rule’ to add a pricing rule.
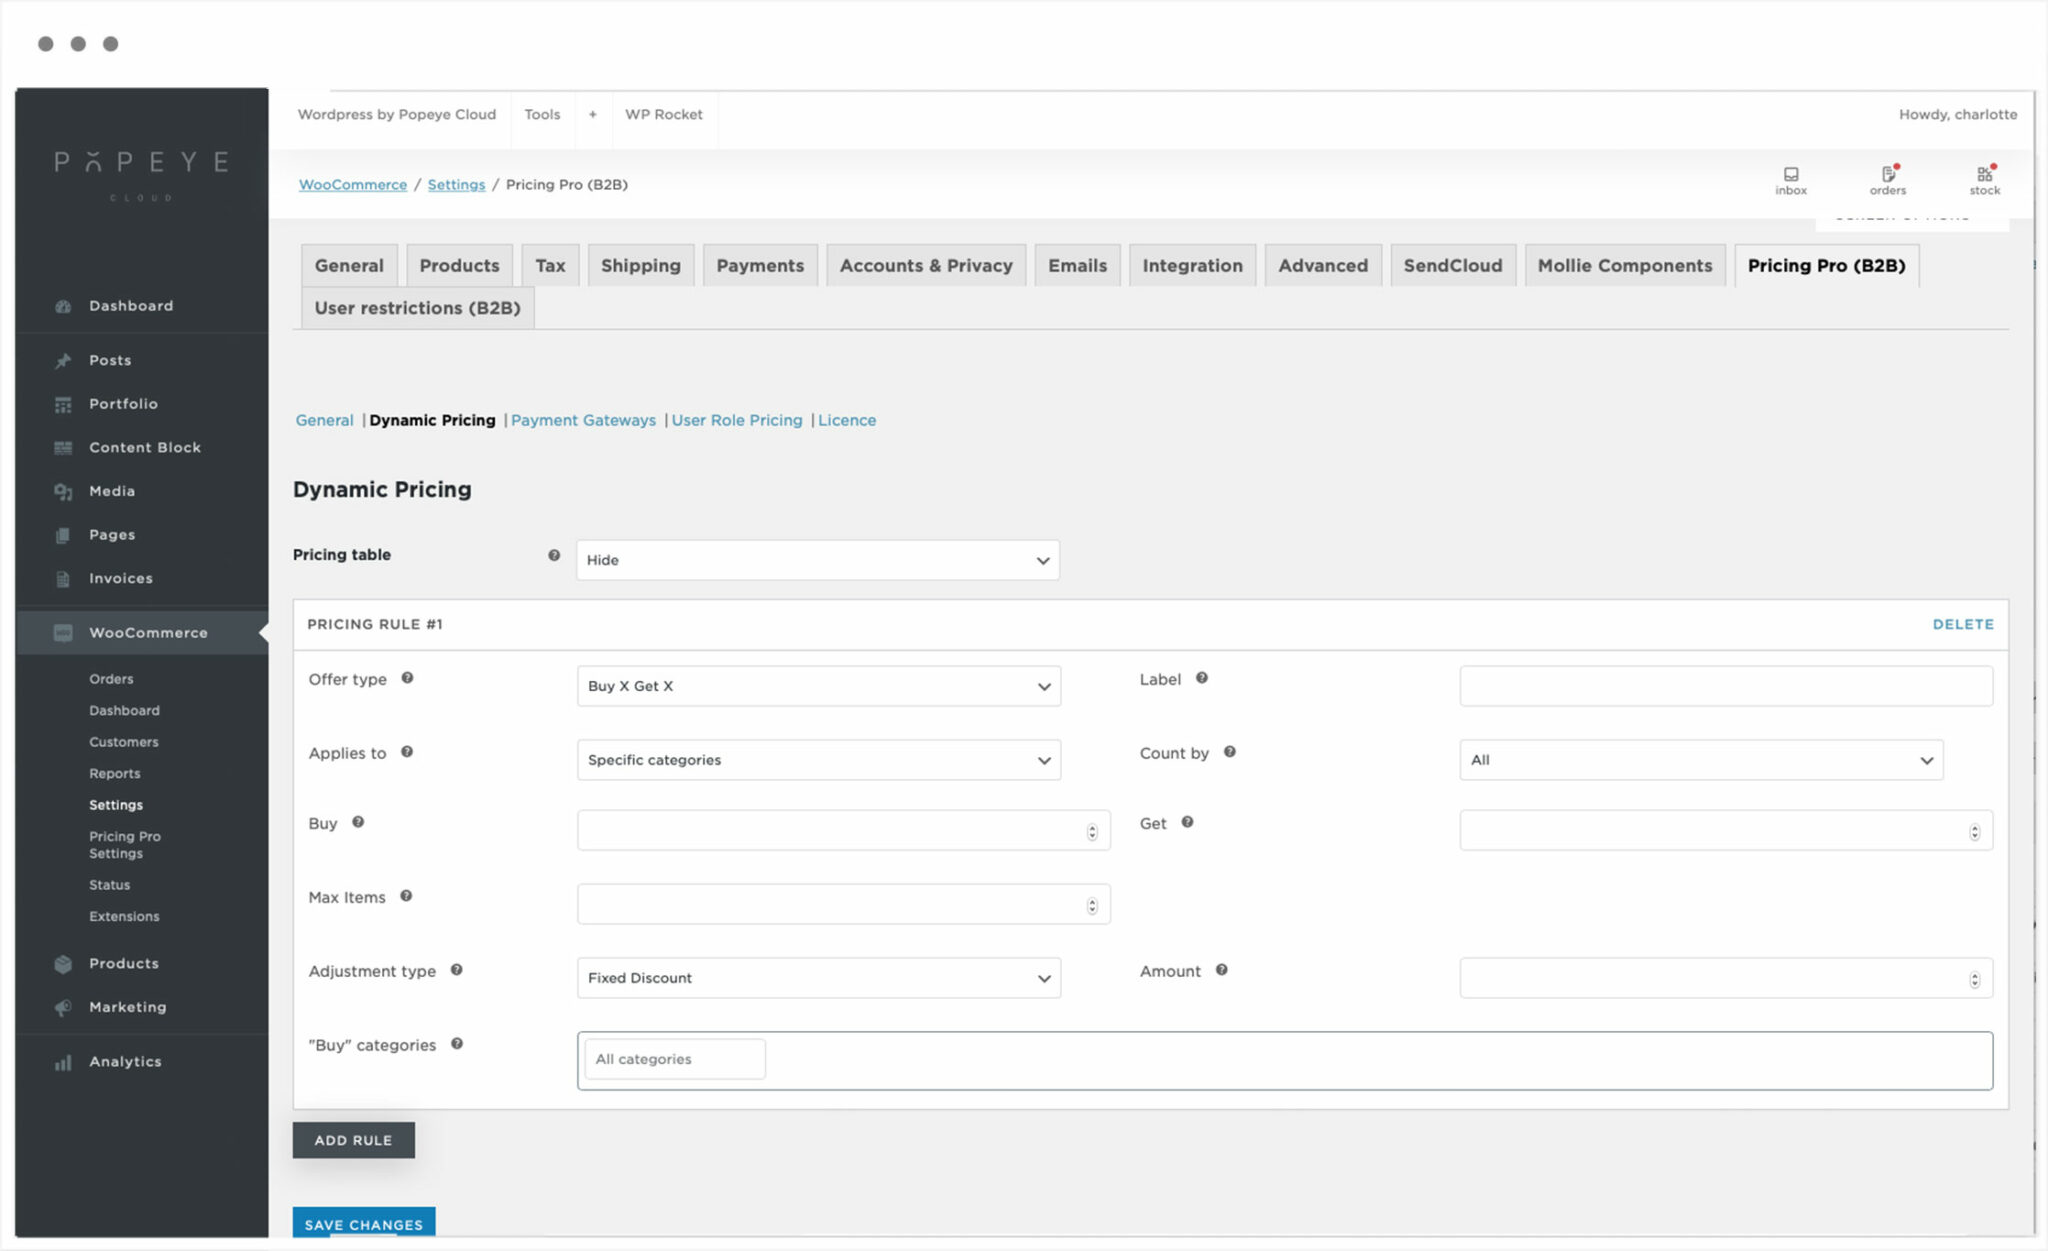
Offer type
The type of discount or fee you’d like to apply
The ‘Offer type’ setting determines the type of pricing rule you’ll create. Choose from:
- Buy X Get X – use this setting if you want to create offers like buy one get one free and the product purchased is the same as the product discounted.
Example: Buy two apples, get one apple free - Buy X Get Y – this is a broader setting than Buy X Get X, also allowing you to create a buy one get one free type offer, but where the product purchased can be different from the product discounted
Example: Buy two apples, get a banana half price
Label
Display a label with the product price. You can add some optional text to the price label to advertise your offer – e.g. ‘Buy one get one half price’.
Applies to
Use this setting to determine which products the offer will apply to. Choose from:
- All items – all items in the store will be eligible for the offer
- Specific categories – this will open a new field where you can select which categories are eligible for the offer
- Specific products – this will open a new field where you can select which products are eligible for the offer
Count by
The ‘Count by’ setting defines how to count items to trigger the offer. Choose from:
- All – if you select ‘All’ here, then all items in the cart will be totalled
- Product – if you select ‘Product’, the plugin will check totals on a product by product basis
Example: in a buy three, get one free offer, the customer has four different items in their cart – one banana, one apple, one peach and one pear. If the ‘Count by’ setting is set to ‘All’, then they qualify for the offer (because they have more than three items in their cart). However, if the ‘Count by’ setting is set to ‘Product’, they don’t qualify for the offer because they don’t have any products in a quantity of three or greater.
Buy
Enter how many items the customer needs to purchase to trigger the offer.
Get
Enter how many items will be discounted when the offer is triggered.
Max items
The maximum number of items that are eligible for the offer. If you want to limit the number of discounted products, enter the number here. Set to 0 to allow an unlimited number of items to qualify for the offer.
Adjustment type
The ‘Adjustment type’ setting defines the type of adjustment. Choose from:
- Fixed discount
- Percentage discount
- Fixed fee
- Percentage fee
Amount
Once you’ve chosen your adjustment type, enter the value of the adjustment here. Depending on whether you have chosen a fixed or percentage adjustment, the ‘Amount’ setting will either be a price value or a percentage.
Buy categories
If you choose ‘Specific categories’ under ‘Applies to’, you’ll see an extra field appear. ‘Buy categories’ allows you to define which product categories are eligible for the offer. Leave empty for all categories to be eligible.

Get categories
If you’ve chosen ‘Buy X Get Y’ in ‘Offer type’ and ‘Specific categories’ in ‘Applies to’, you’ll also see the ‘Get categories’ field. This allows you to define which categories the discounted items will be drawn from.
Buy products
If you choose ‘Specific products’ under ‘Applies to’, you’ll see an extra field appear. ‘Buy products’ allows you to define which products are eligible for the offer. Leave empty for all products to be eligible.

Get products
If you’ve chosen ‘Buy X Get Y’ in ‘Offer type’ and ‘Specific products’ in ‘Applies to’, you’ll also see the ‘Get products’ field. This allows you to define which products the discounted items will be drawn from.
Tips 'n tricks
Hover over the question mark to get more info.
How to add attributes for variations use
How to add attributes for variations use
— Add attributes to set role-based pricing on a variation by variation basis.
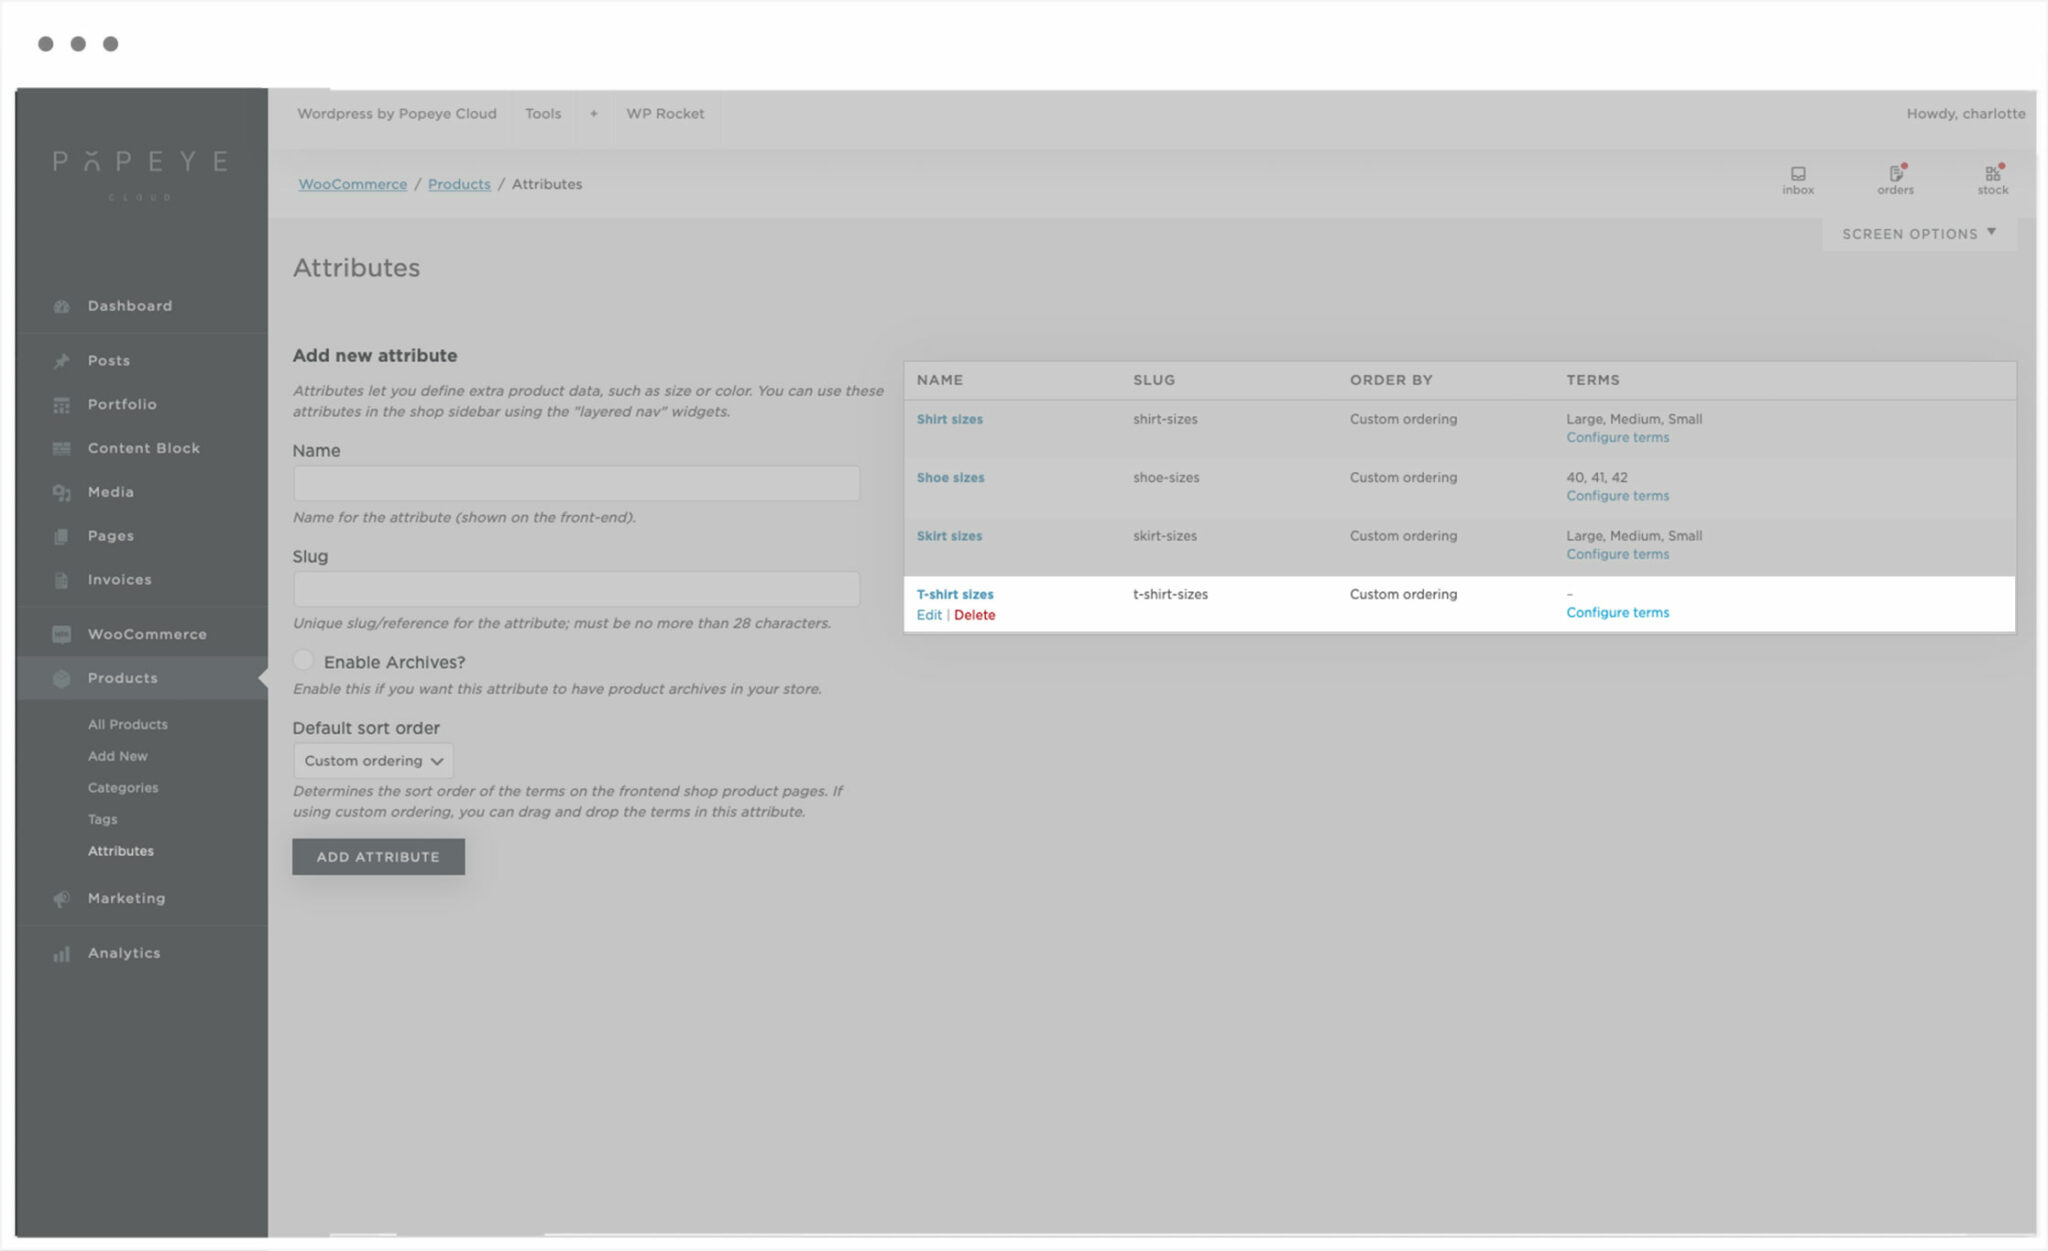
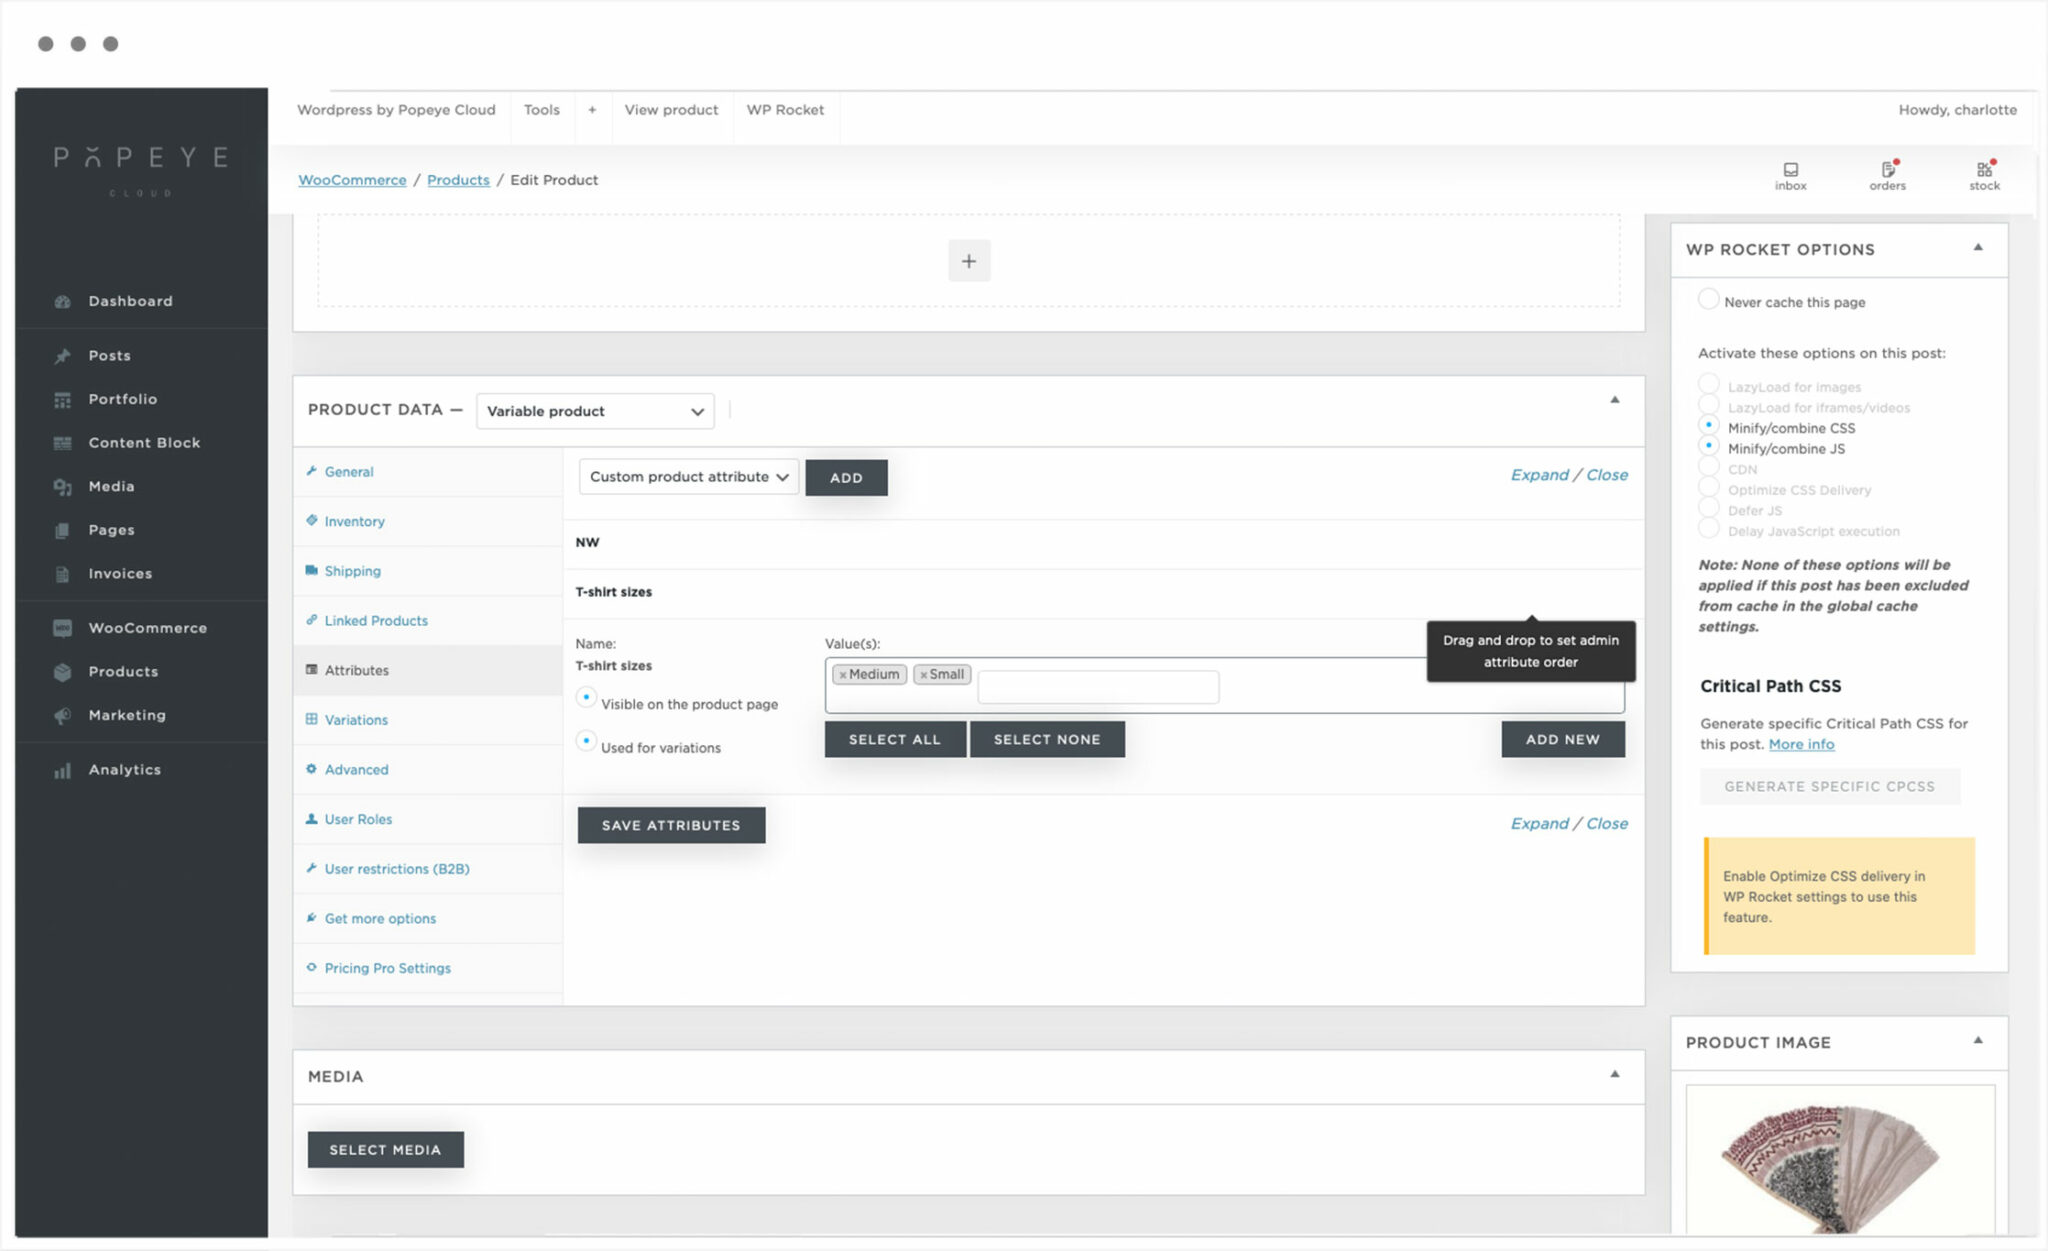
Products attributes
Products > Attributes > Add new attribute by entering a name
Attributes let you define extra product data, such as size or color.
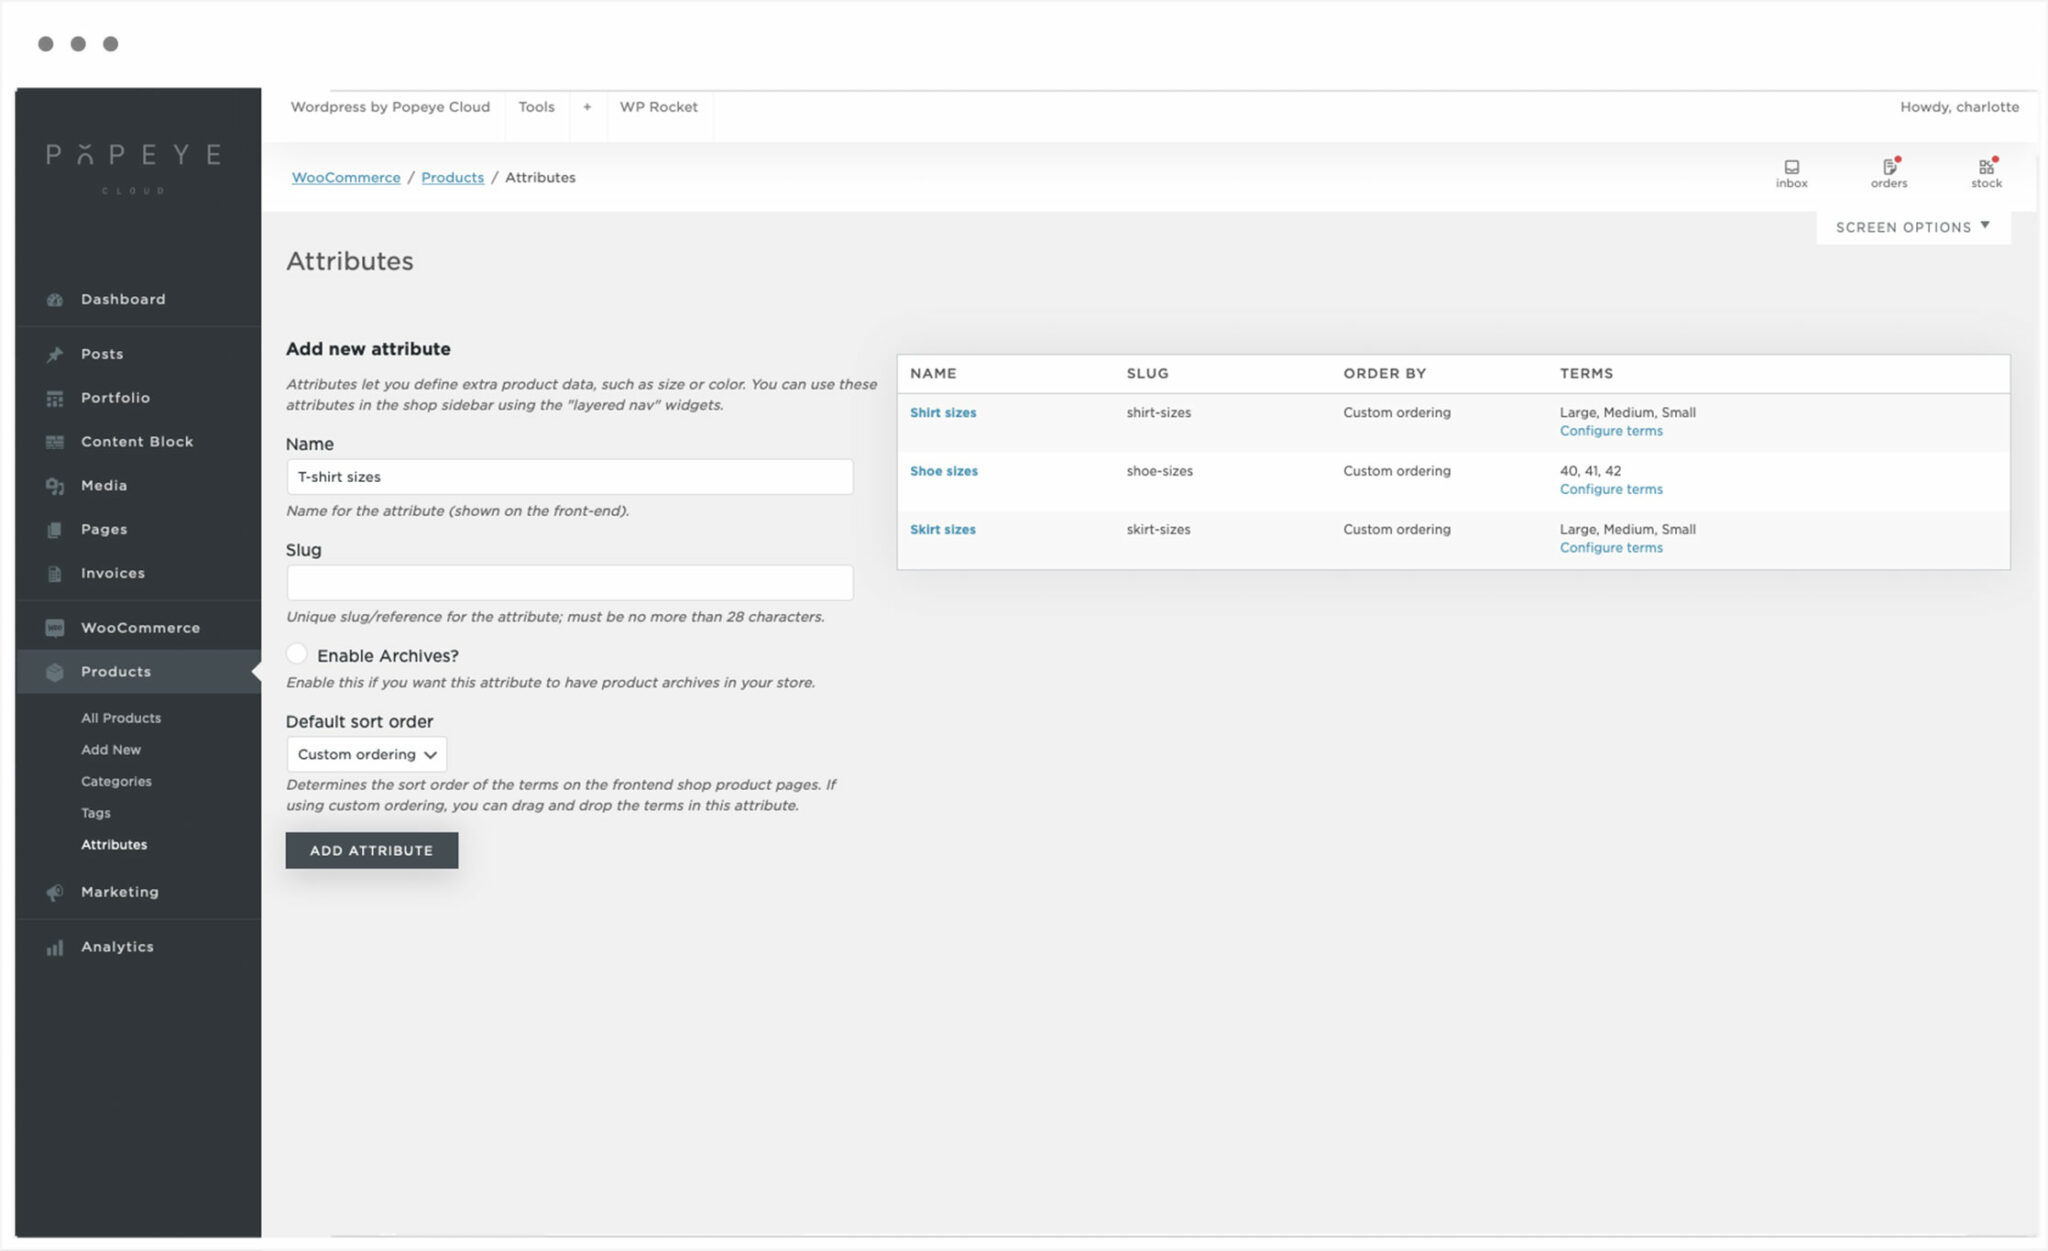
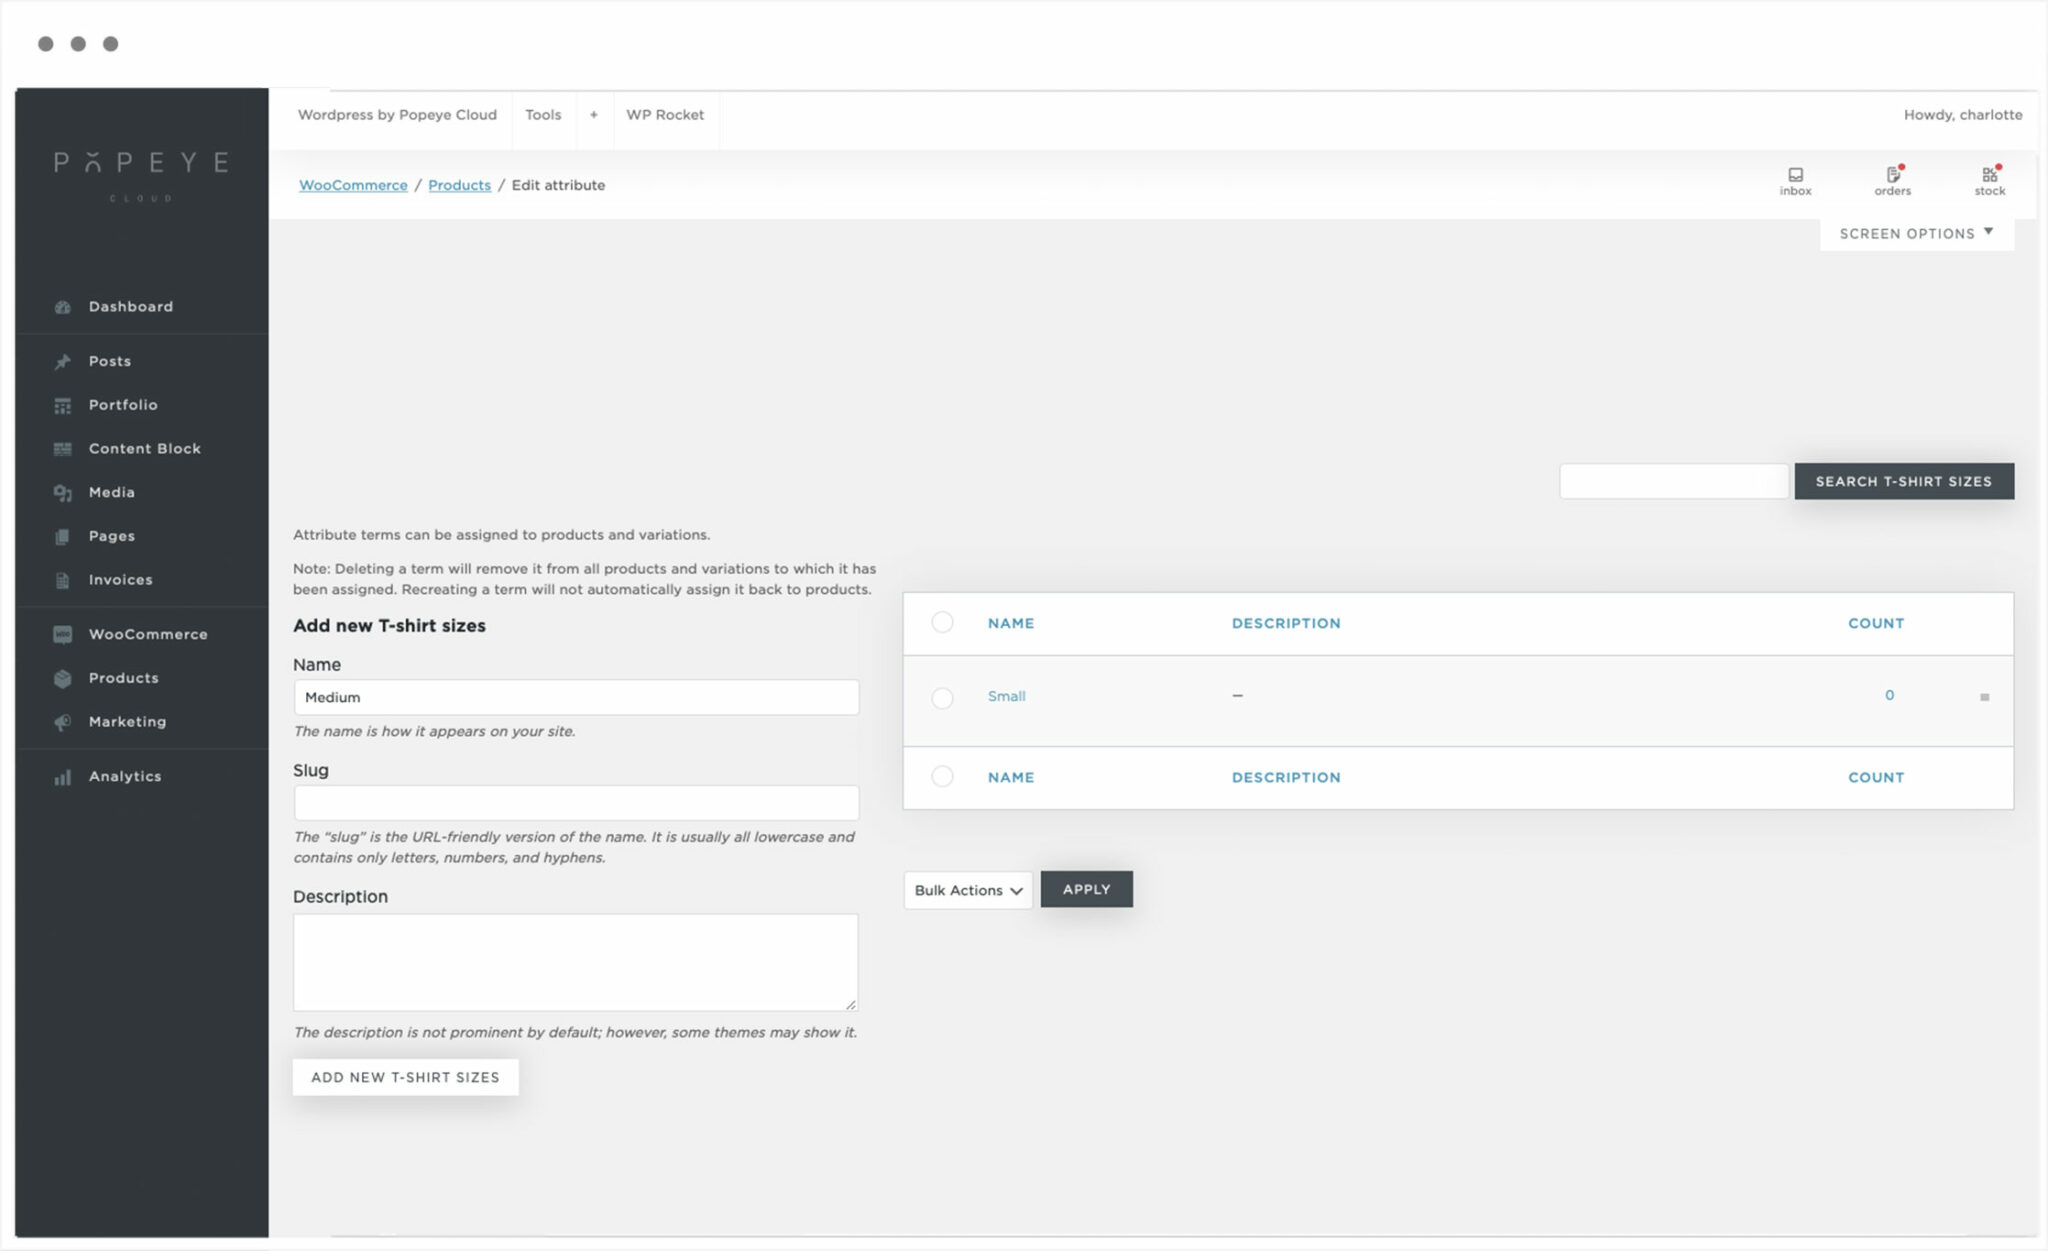
Terms > configure terms
Attribute terms can be assigned to products and variations.
Note: Deleting a term will remove it from all products and variations to which it has been assigned. Recreating a term will not automatically assign it back to products.
Add new sizes name e.x: small, medium, large
Products
Go to a product. Variable product > attributes
Choose your attribute you just created > add
Enable ‘used for variations’ + select all > save attributes
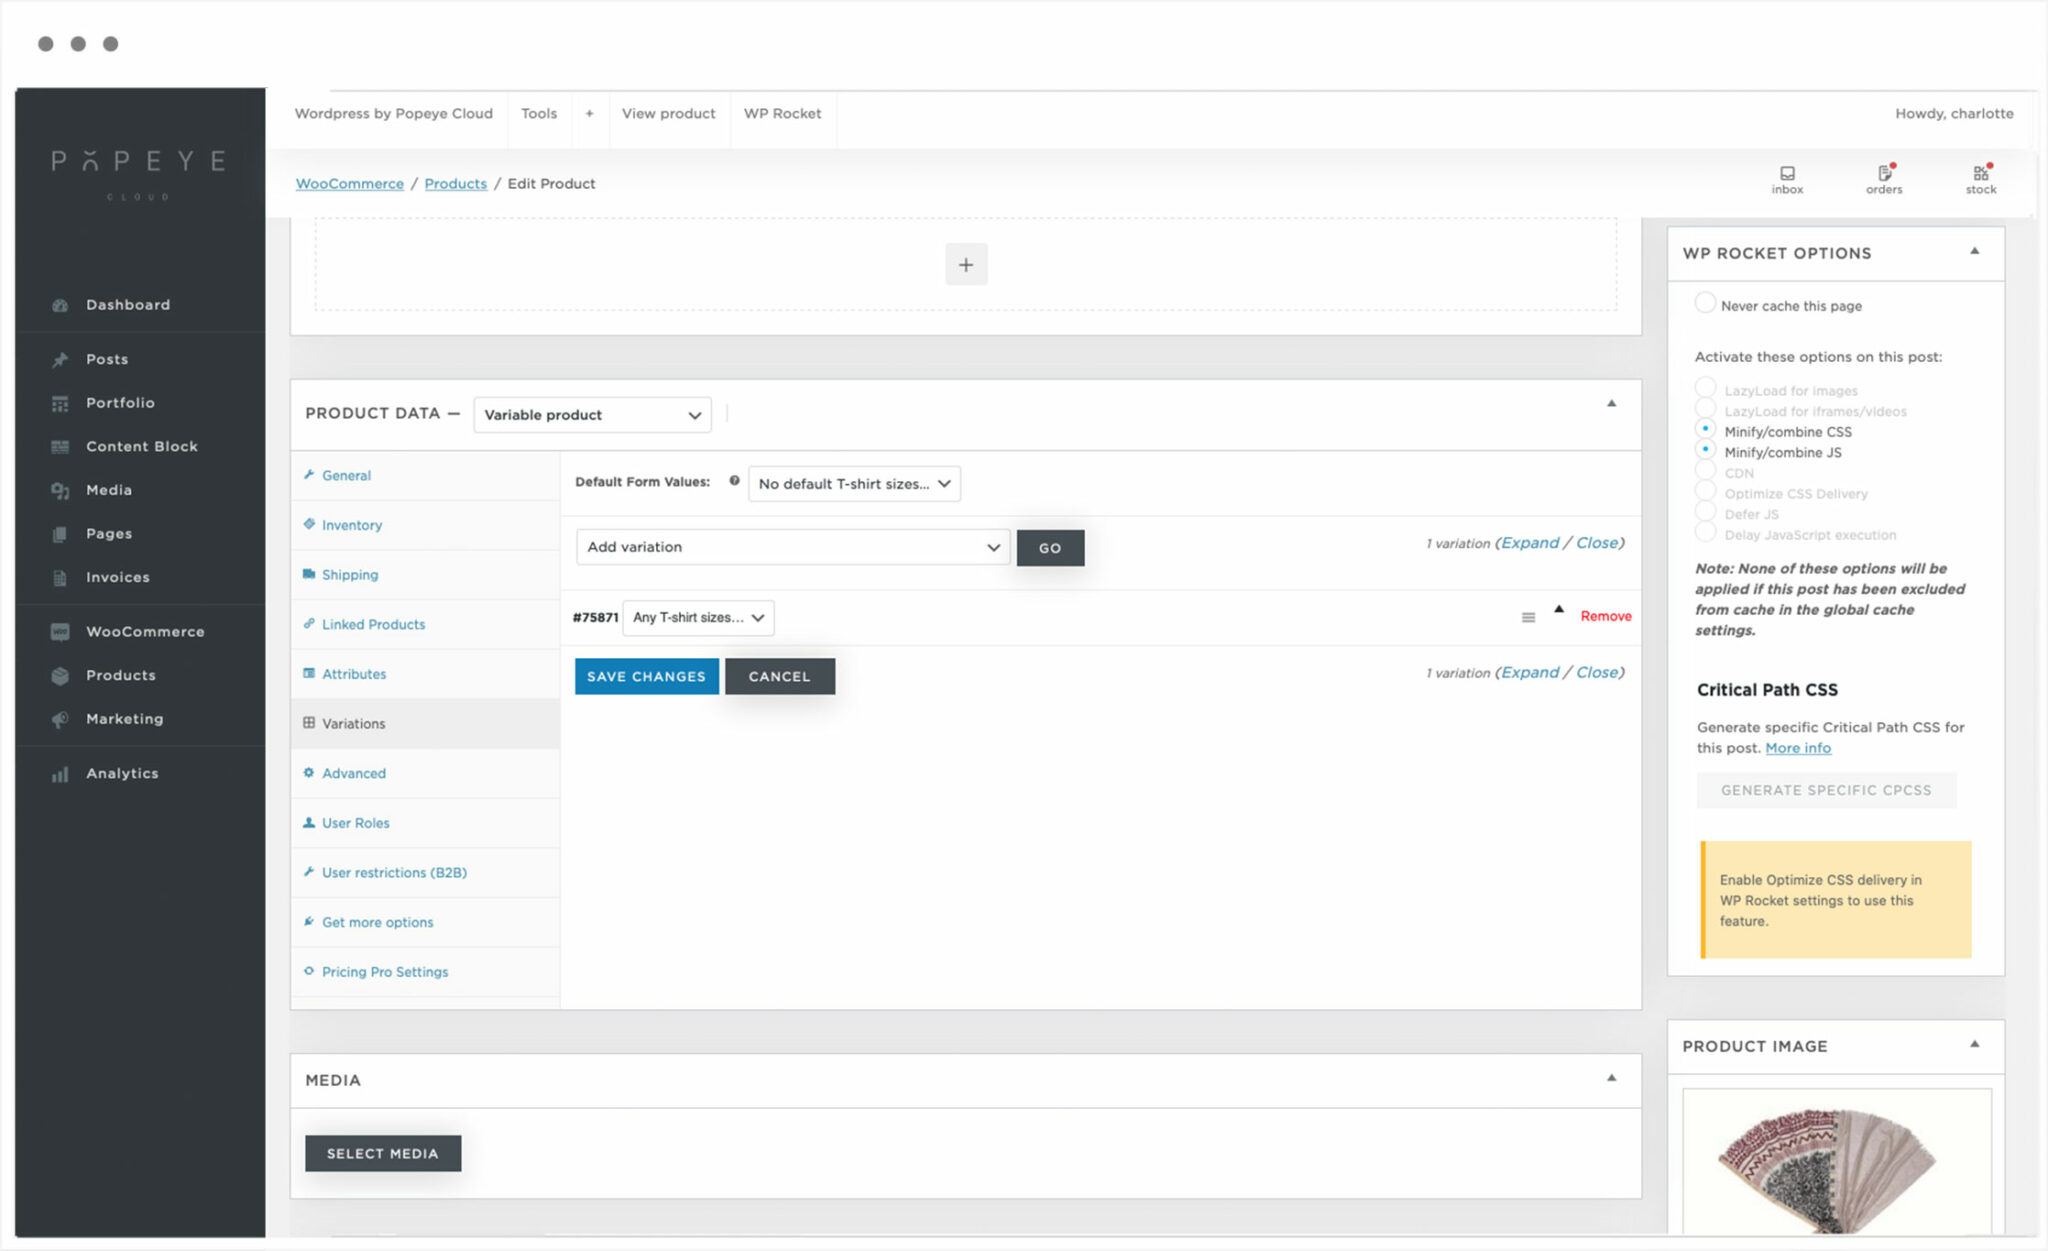
Variations
Variation tab > Add variation > Go
Tips 'n tricks
After you created variations, you can set role-based pricing rules: role based pricing rules for variations
Role-based pricing rules for variations
Role-based pricing rules for variations
— You can set role-based pricing rules on a variation by variation basis.
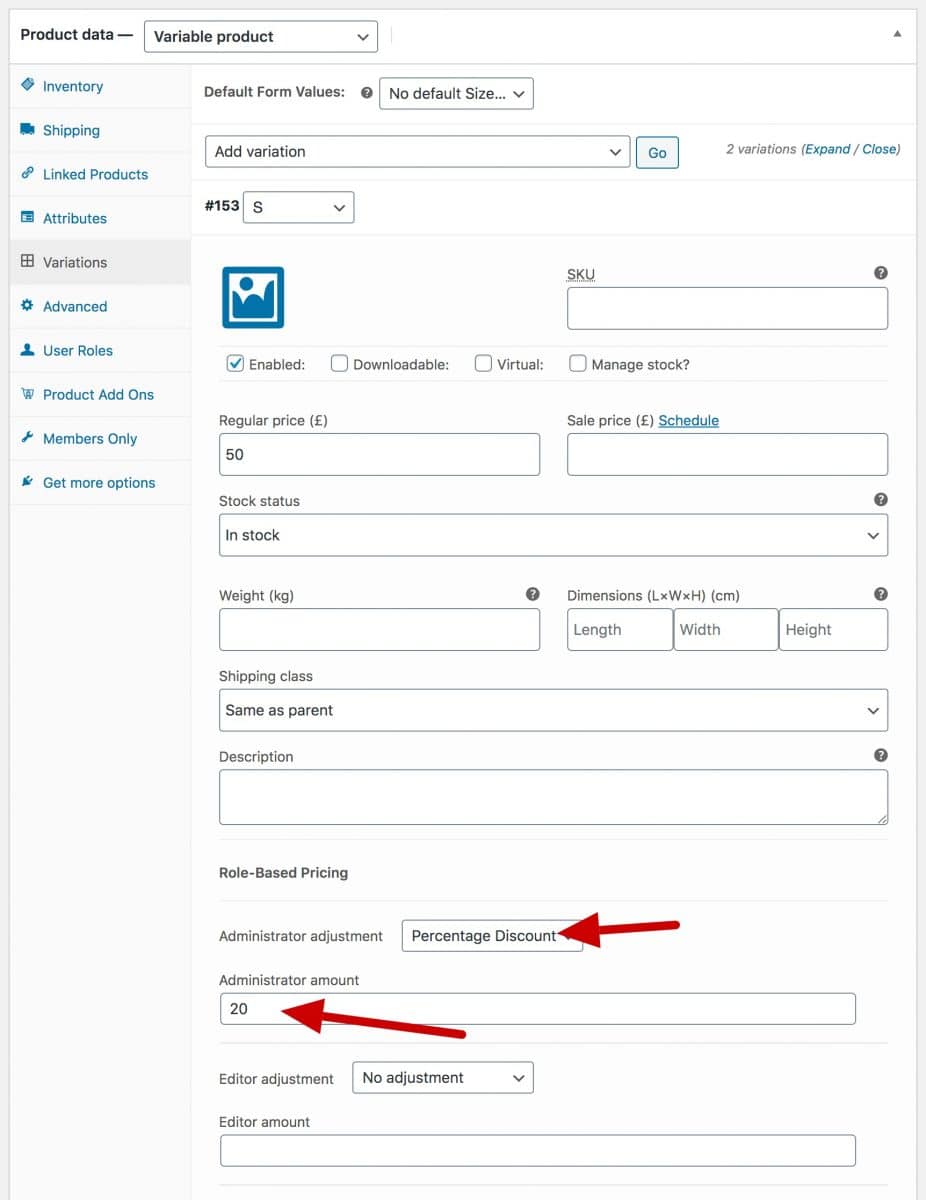
How to set role-based pricing rules on a variation
Any rules set at variation level will override product or global role-based pricing rules.
To set role-based pricing rules for a variation, click on the Variations tab in the Product Data section. Select the variation to edit. You’ll see a list of all available rules with options for setting discounts or fees.
Tips 'n tricks
Don't know how to create variations? Go check out this link
Set role based pricing rules
Set role based pricing rules
— You can set role based pricing in a couple of different ways.
Setting global role based pricing rules
To set global pricing rules, go to WooCommerce > Settings > Pricing Pro (B2B) and ensure the ‘Enable User Role Pricing’ option is selected.
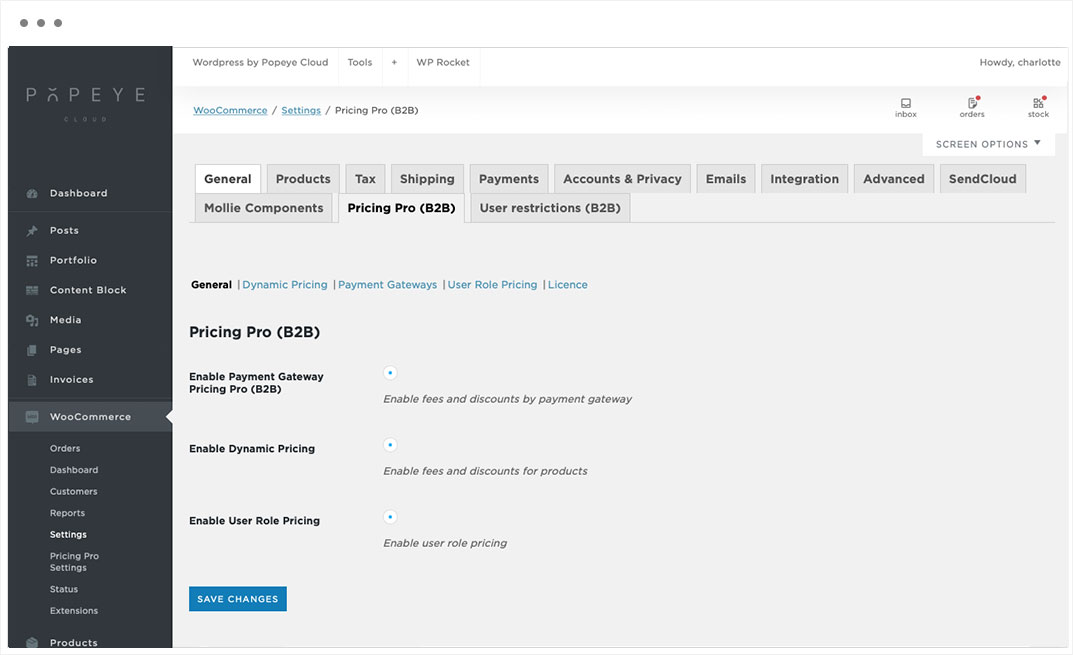
You can then click on the ‘User Role Pricing’ menu item and set rules for each user role.

In the ‘Adjustment’ column, pick the type of discount or fee you want to apply.
In the ‘Amount’ column, pick the amount.
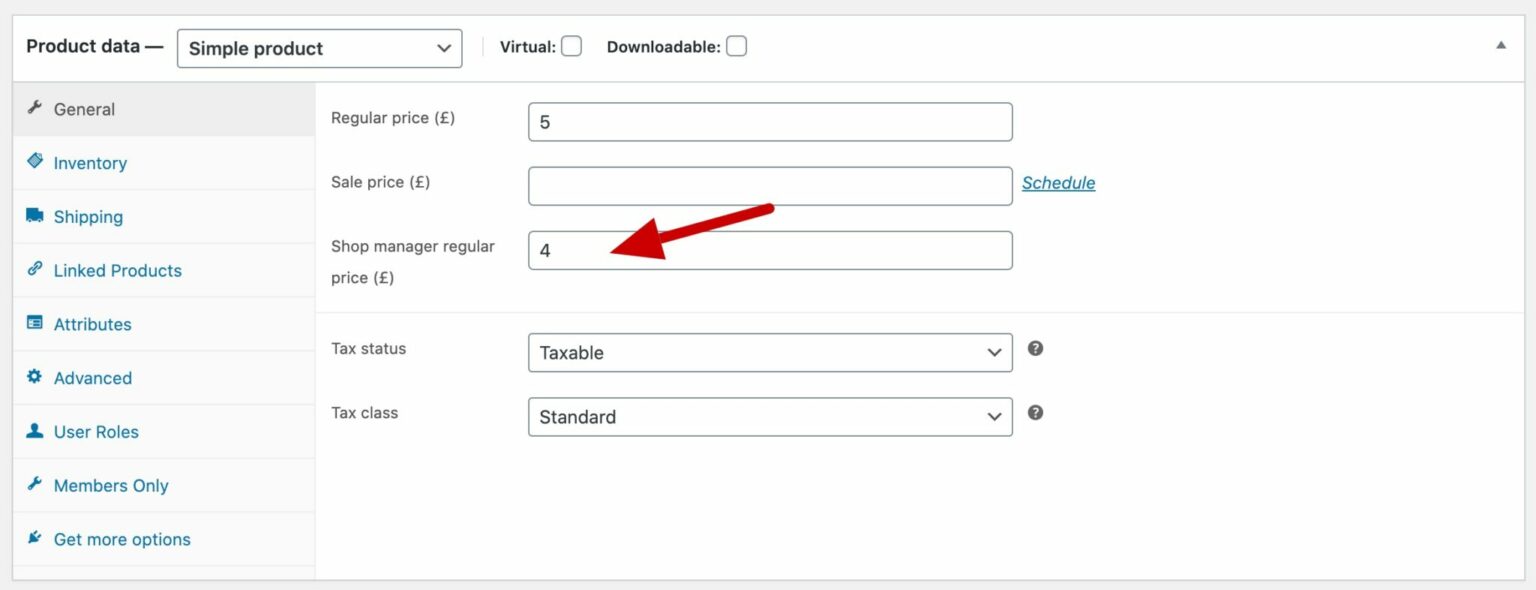
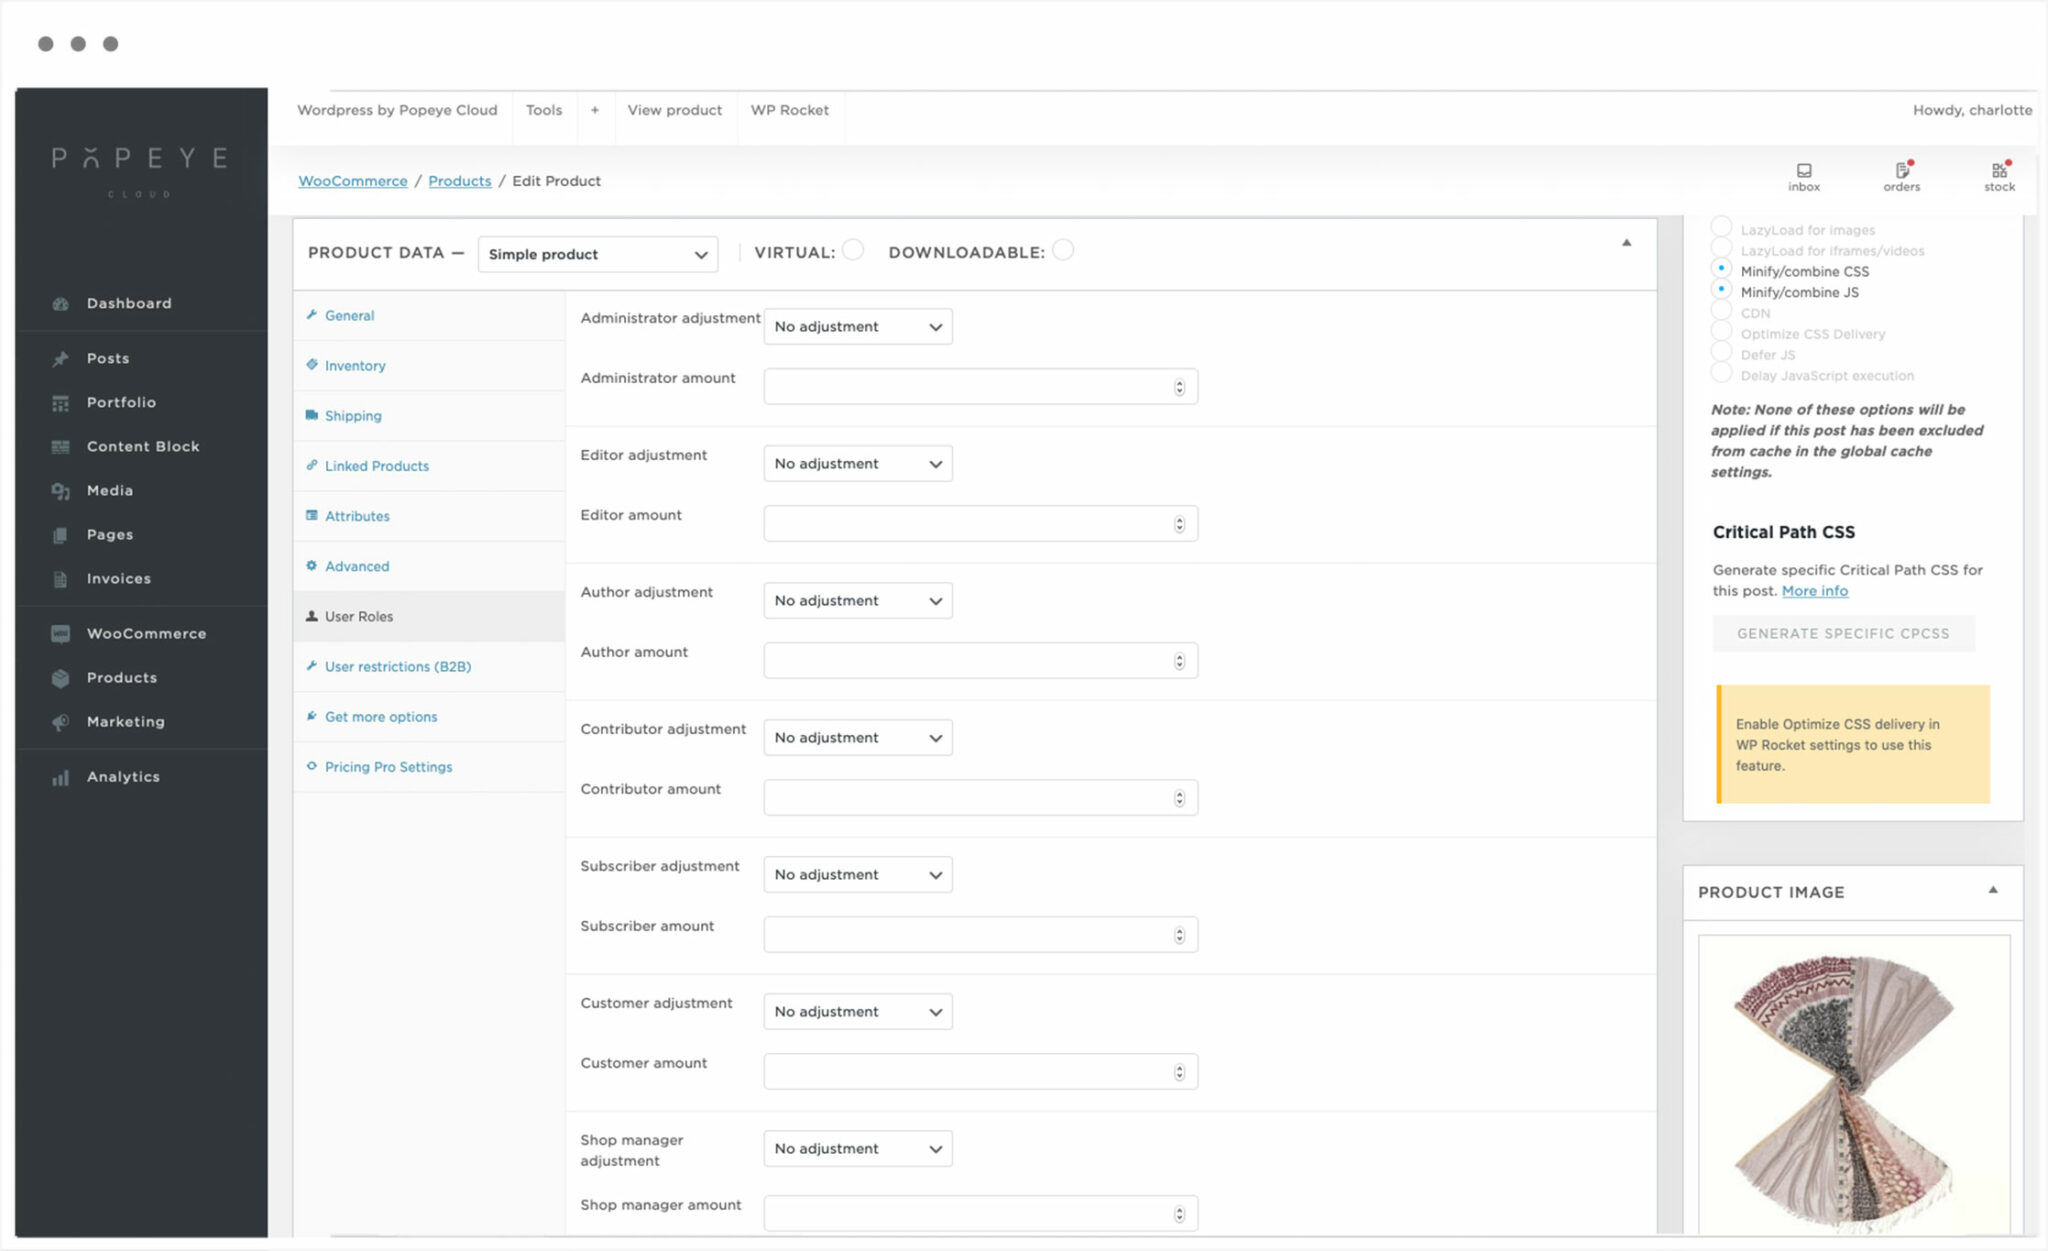
Setting role-based discounts and fees by product
If you want to apply role based pricing on a product by product basis, you can do so from the edit screen for individual products.
Click the ‘User Roles’ tab in the ‘Product Data’ section and enter the adjustment type and amount as above.
Setting specific prices per product for different user roles
Finally, if you don’t want to apply universal discounts or fees to products for different user roles, you can enter different prices per product for certain roles.
To select which roles should be enabled for role-based pricing, go to WooCommerce > Settings > Pricing Pro (B2B) > User Role Pricing and enter the roles in the ‘Role Price Fields’ setting. You can enter as many roles as you like here.
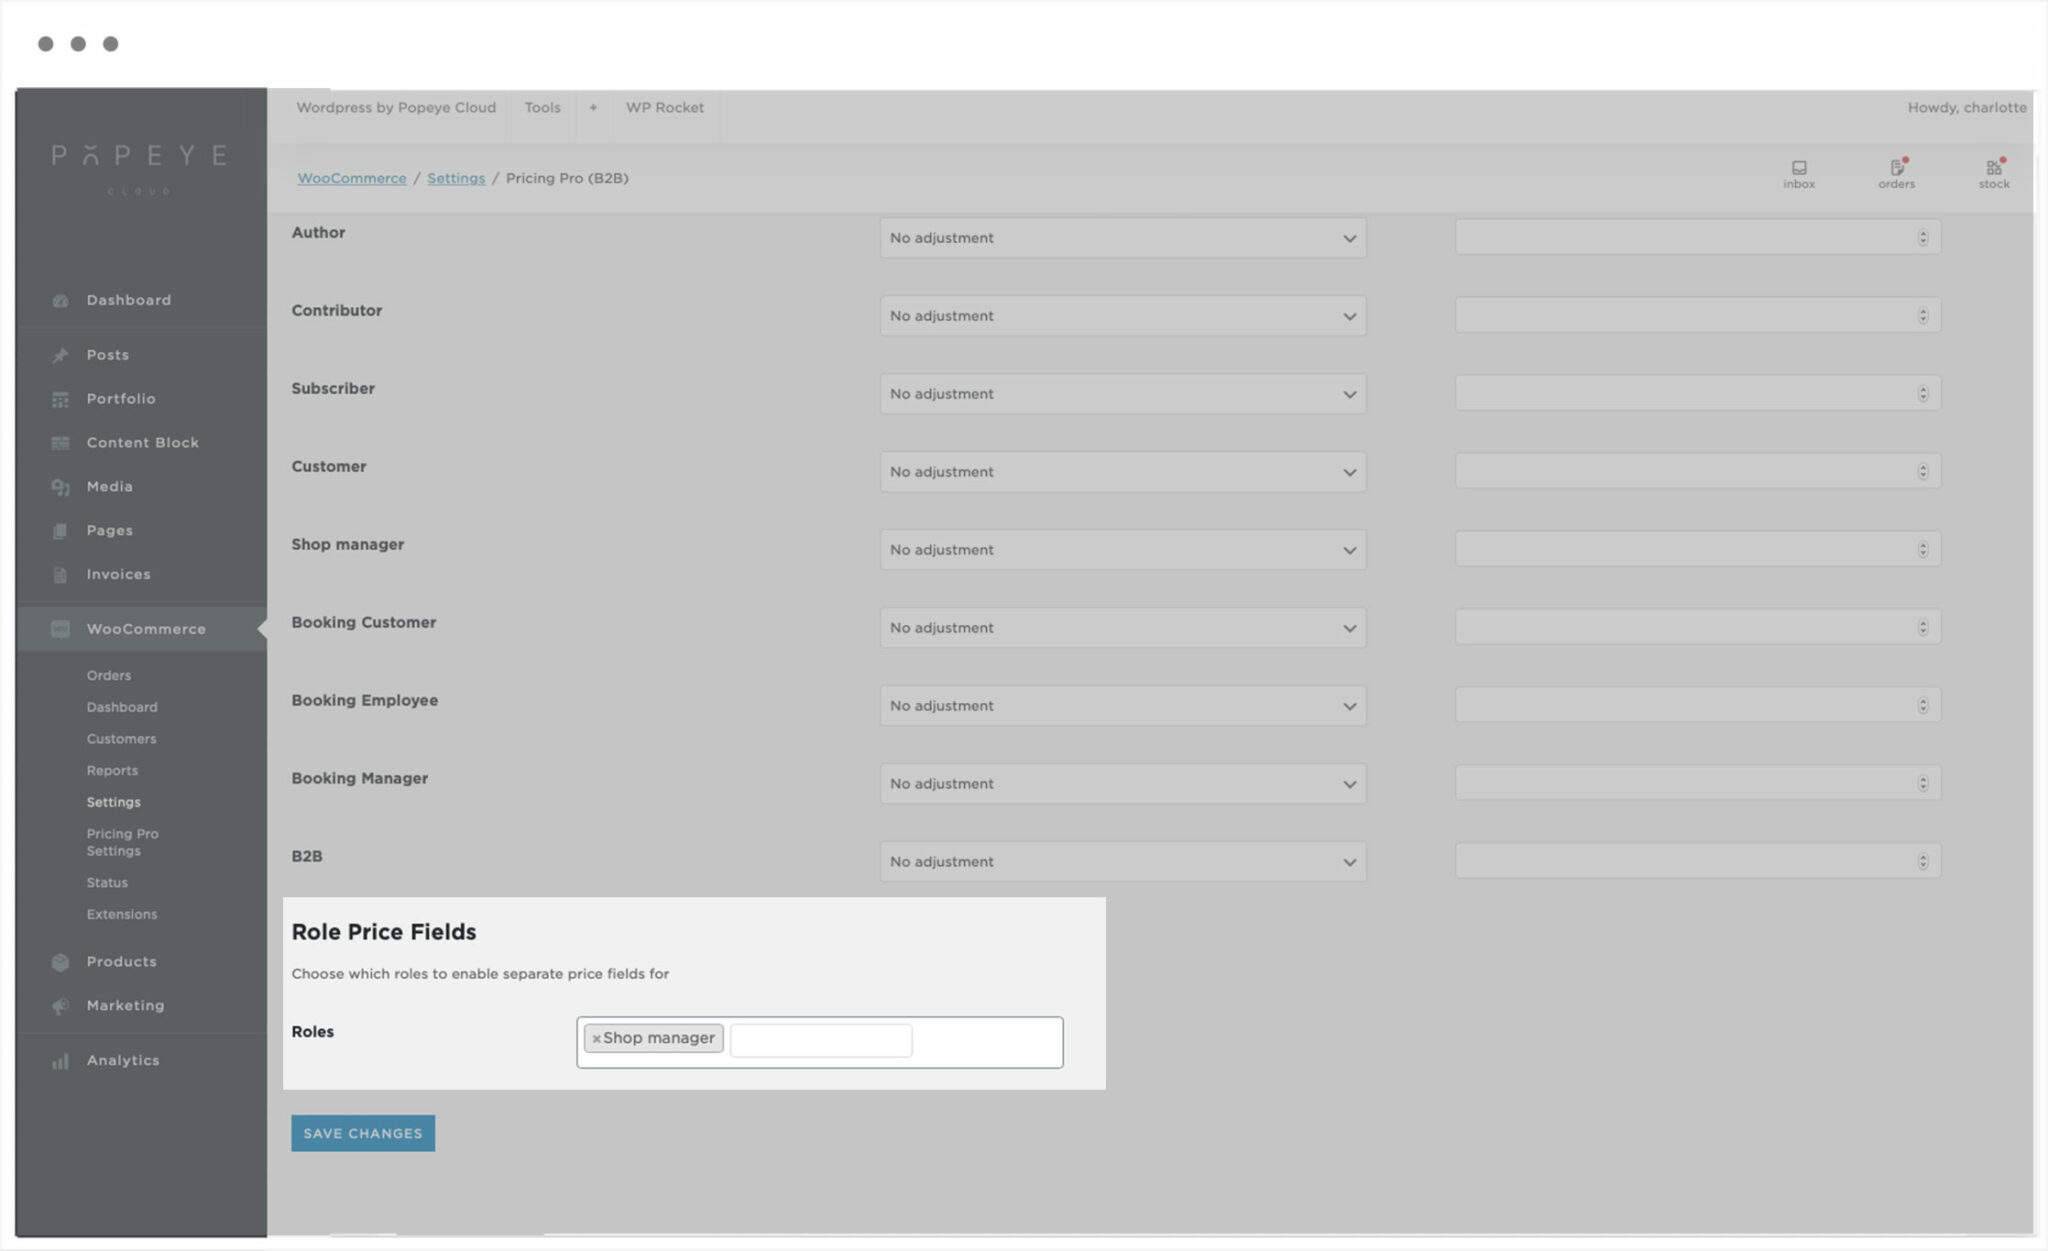
This will enable additional product price fields for each specified role.